前言
大家好,这里是 CSS 兼 WebGL 魔法使——alphardex。
上周末刚在原神里抽到了“火花骑士”可莉,于是就心血来潮,想用 three.js 来实现一种火系的特效,不是炸弹的爆炸,而是炸弹爆炸后在草上留下的火花效果
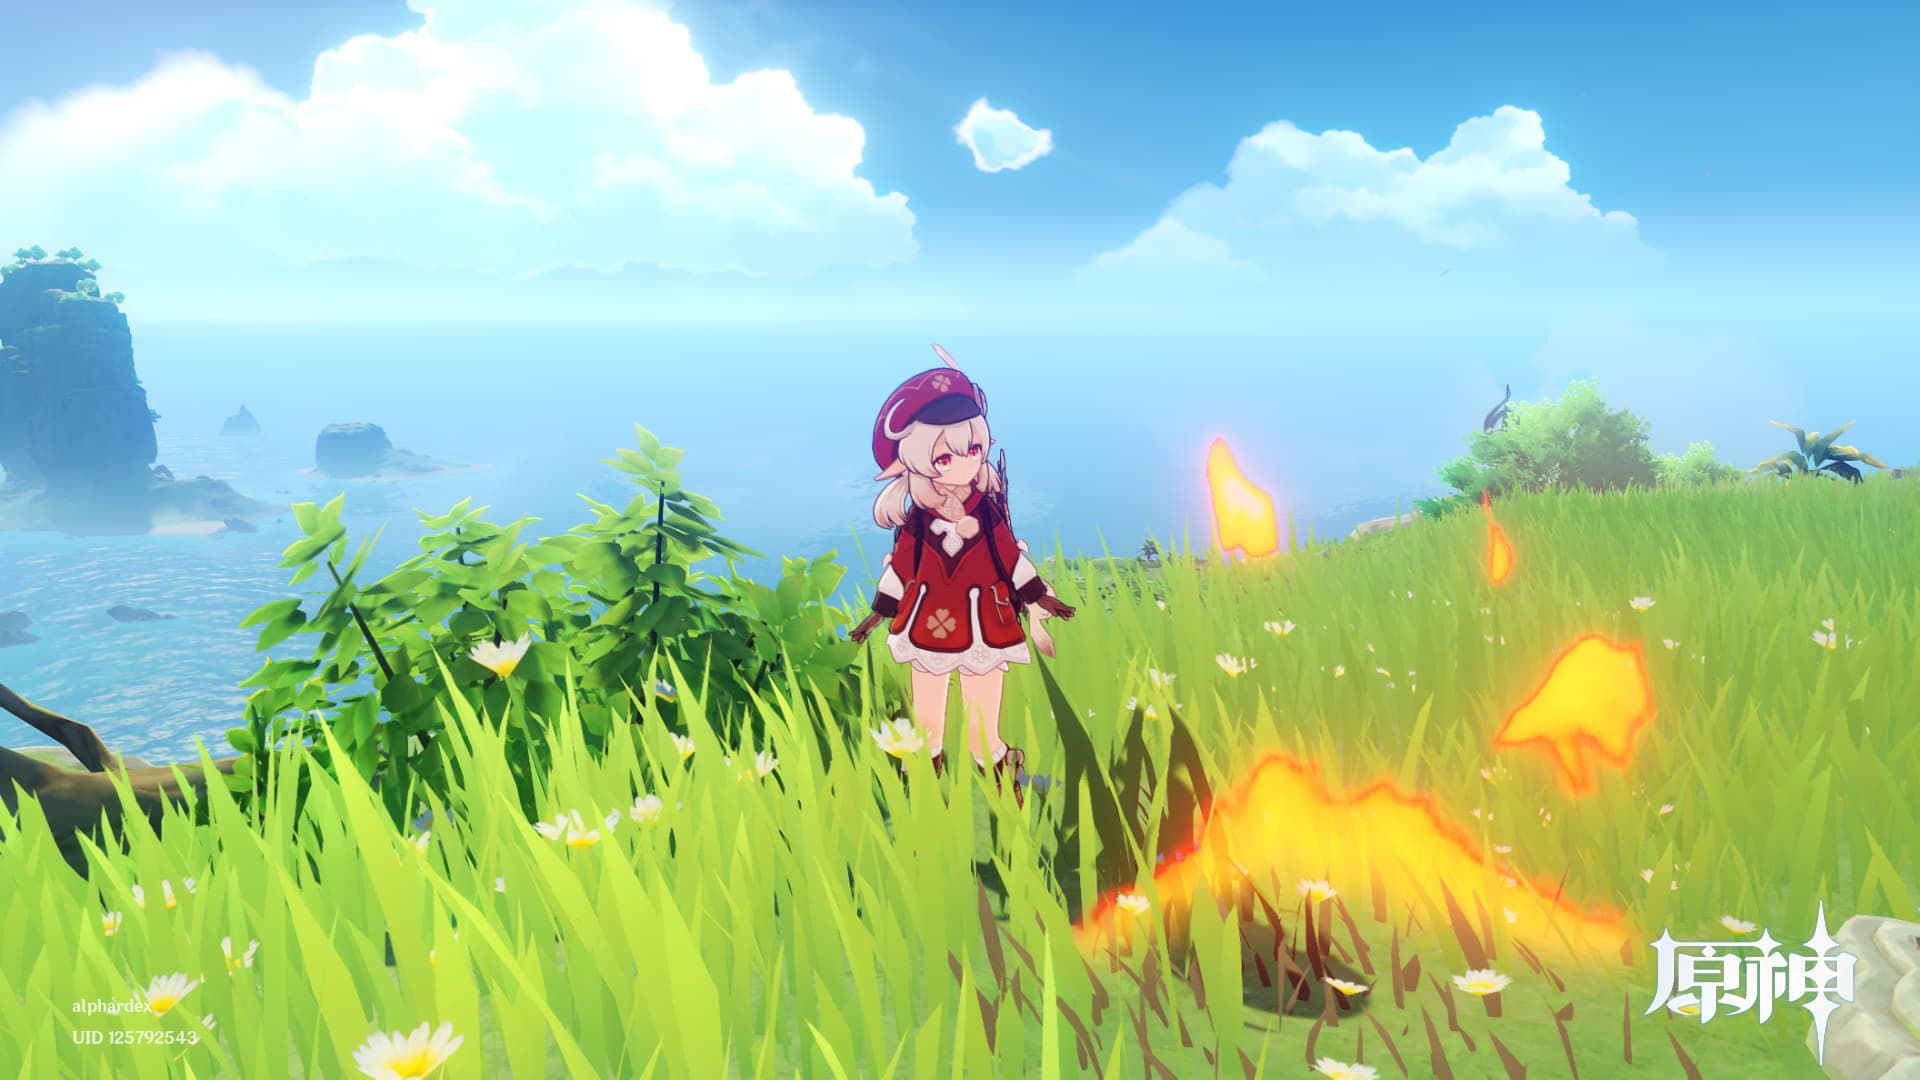
游戏里的效果相对比较卡通化,而本文的效果将更加逼近现实一点

让我们开始吧!
准备工作
在开始本项目之前,你首先要了解 ray marching 这个概念,如果不了解也没关系,笔者之前写过一篇介绍它的入门文章,或者通过这篇文章也可以入门,掌握了基础概念后就可以开始了
本项目需要用到:
笔者的three.js 模板:点击右下角的 fork 即可复制一份
着色器模块化:glslify
着色器 npm 包:glsl-noise,glsl-sdf-primitives,glsl-sdf-ops
正文
场景搭建
按之前的惯例,搭建一个场景,放一个铺满屏幕的平面,设定一些必要的参数(火花的速度与颜色)
1
2
3
4
5
6
7
8
9
10
11
12
13
14
15
16
17
18
19
20
21
22
23
24
25
26
27
28
29
30
31
32
33
34
35
36
37
38
39
40
41
42
43
44
45
46
47
48
49
50
51
52
53
54
55
56
57
58
59
60
61
62
63
64
65
66
67
68
69
70
71
72
73
74
| class RayMarchingFire extends Base {
constructor(sel: string, debug: boolean) {
super(sel, debug);
this.clock = new THREE.Clock();
this.cameraPosition = new THREE.Vector3(0, 0, 1);
this.params = {
velocity: 2,
};
this.colorParams = {
color1: "#ff801a",
color2: "#ff5718",
};
}
init() {
this.createScene();
this.createOrthographicCamera();
this.createRenderer();
this.createRayMarchingFireMaterial();
this.createPlane();
this.createLight();
this.trackMousePos();
this.addListeners();
this.setLoop();
}
createRayMarchingFireMaterial() {
const rayMarchingFireMaterial = new THREE.ShaderMaterial({
vertexShader: rayMarchingFireVertexShader,
fragmentShader: rayMarchingFireFragmentShader,
side: THREE.DoubleSide,
uniforms: {
uTime: {
value: 0,
},
uMouse: {
value: new THREE.Vector2(0, 0),
},
uResolution: {
value: new THREE.Vector2(window.innerWidth, window.innerHeight),
},
uVelocity: {
value: 3,
},
uColor1: {
value: new THREE.Color(this.colorParams.color1),
},
uColor2: {
value: new THREE.Color(this.colorParams.color2),
},
},
});
this.rayMarchingFireMaterial = rayMarchingFireMaterial;
this.shaderMaterial = rayMarchingFireMaterial;
}
createPlane() {
const geometry = new THREE.PlaneBufferGeometry(2, 2, 100, 100);
const material = this.rayMarchingFireMaterial;
this.createMesh({
geometry,
material,
});
}
update() {
const elapsedTime = this.clock.getElapsedTime();
const mousePos = this.mousePos;
if (this.rayMarchingFireMaterial) {
this.rayMarchingFireMaterial.uniforms.uTime.value = elapsedTime;
this.rayMarchingFireMaterial.uniforms.uMouse.value = mousePos;
}
}
}
|
接下来开始编写片元着色器
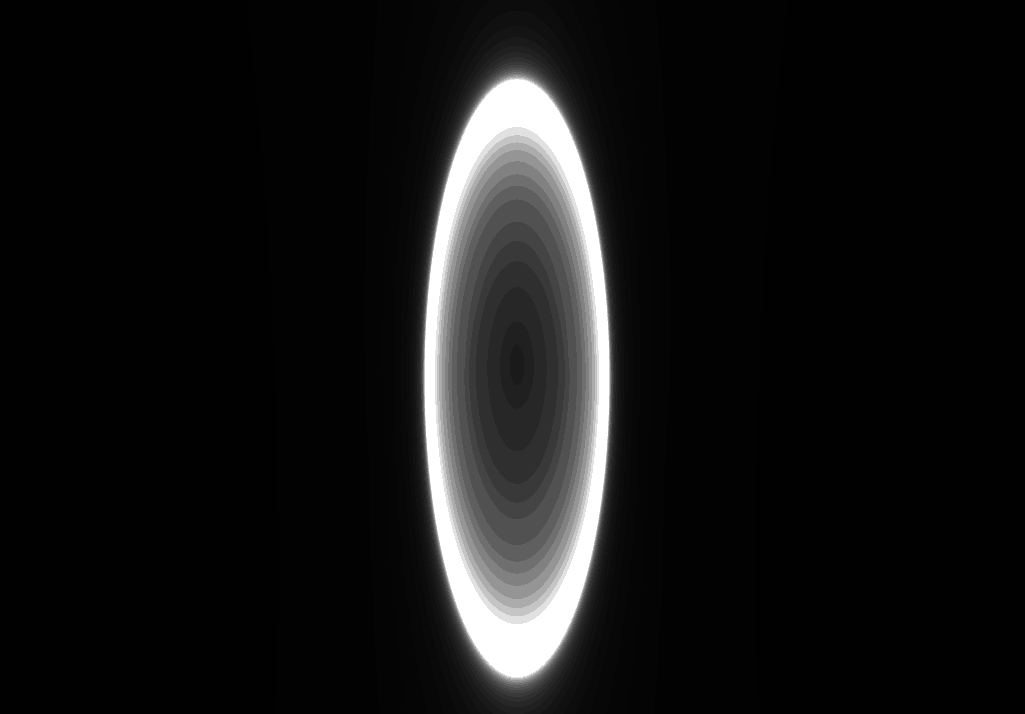
创建发光渐变椭圆
仔细观察火花的形状你会发现其实它的大致形状像一个椭圆,而且还是发光的渐变椭圆,于是我们就要想办法来创建这种形状。
简要说下思路:ray marching 获取的值改成光线位置 pos 和光线移动的进度 strength,光线位置的 y 轴将用于设定火花的颜色;光线移动的进度 strength 用于设定火花的形状(这里就是椭圆)
1
2
3
4
5
6
7
8
9
10
11
12
13
14
15
16
17
18
19
20
21
22
23
24
25
26
27
28
29
30
31
32
33
34
35
36
37
38
39
40
41
42
43
44
45
46
47
48
49
50
51
52
53
54
55
56
57
58
59
60
61
62
63
64
| #pragma glslify:centerUv=require(../modules/centerUv)
#pragma glslify:getRayDirection=require(../modules/getRayDirection)
#pragma glslify:sdSphere=require(glsl-sdf-primitives/sdSphere)
#pragma glslify:opU=require(glsl-sdf-ops/union)
#pragma glslify:cnoise=require(glsl-noise/classic/3d)
uniform float uTime;
uniform vec2 uMouse;
uniform vec2 uResolution;
uniform float uVelocity;
uniform vec3 uColor1;
uniform vec3 uColor2;
varying vec2 vUv;
varying vec3 vPosition;
float fire(vec3 p){
vec3 p2=p*vec3(1.,.5,1.)+vec3(0.,1.,0.);
float geo=sdSphere(p2,1.);
float result=geo;
return result;
}
vec2 sdf(vec3 p){
float result=opU(abs(fire(p)),-(length(p)-100.));
float objType=1.;
return vec2(result,objType);
}
vec4 rayMarch(vec3 eye,vec3 ray){
float depth=0.;
float strength=0.;
float eps=.02;
vec3 pos=eye;
for(int i=0;i<64;i++){
pos+=depth*ray;
float dist=sdf(pos).x;
depth=dist+eps;
if(dist>0.){
strength=float(i)/64.;
}
}
return vec4(pos,strength);
}
void main(){
vec2 p=centerUv(vUv,uResolution);
p=p*vec2(1.6,-1);
vec3 ro=vec3(0.,-2.,4.);
vec3 ta=vec3(0.,-2.5,-1.5);
float fl=1.25;
vec3 rd=getRayDirection(p,ro,ta,fl);
vec3 color=vec3(0.);
vec4 result=rayMarch(ro,rd);
float strength=pow(result.w*2.,4.);
vec3 ellipse=vec3(strength);
color=ellipse;
gl_FragColor=vec4(color,1.);
}
|
centerUv.glsl
1
2
3
4
5
6
7
8
| vec2 centerUv(vec2 uv,vec2 resolution){
uv=2.*uv-1.;
float aspect=resolution.x/resolution.y;
uv.x*=aspect;
return uv;
}
#pragma glslify:export(centerUv);
|
getRayDirection.glsl
1
2
3
4
5
6
7
8
9
| #pragma glslify:setCamera=require(./setCamera)
vec3 getRayDirection(vec2 p,vec3 ro,vec3 ta,float fl){
mat3 ca=setCamera(ro,ta,0.);
vec3 rd=ca*normalize(vec3(p,fl));
return rd;
}
#pragma glslify:export(getRayDirection)
|
setCamera.glsl
1
2
3
4
5
6
7
8
9
10
| mat3 setCamera(in vec3 ro,in vec3 ta,float cr)
{
vec3 cw=normalize(ta-ro);
vec3 cp=vec3(sin(cr),cos(cr),0.);
vec3 cu=normalize(cross(cw,cp));
vec3 cv=(cross(cu,cw));
return mat3(cu,cv,cw);
}
#pragma glslify:export(setCamera)
|
用噪声生成火花
接下来就对这个椭圆应用上噪声(这里选了传统噪声,为了更好看的外观,也可以选择其他的噪声)
1
2
3
4
5
6
7
8
9
10
| float fire(vec3 p){
vec3 p2=p*vec3(1.,.5,1.)+vec3(0.,1.,0.);
float geo=sdSphere(p2,1.);
float displacement=uTime*uVelocity;
vec3 displacementY=vec3(.0,displacement,.0);
float noise=(cnoise(p+displacementY))*p.y*.4;
float result=geo+noise;
return result;
}
|
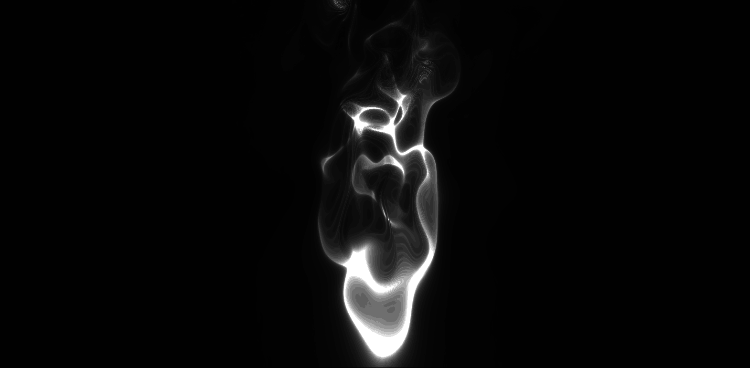
莫名感觉像黑魂 3 里的芙莉德修女的黑焰,尽管这样也很 cool,我们还是给它加上颜色,让它更像现实中的火花
给火花加上颜色
将颜色通过 mix 函数混合起来(强度是光线位置的 y 轴),和之前的颜色相乘即可
1
2
3
4
5
6
7
8
9
| void main(){
...
float fireBody=result.y/64.;
vec3 mixColor=mix(uColor1,uColor2,fireBody);
color*=mixColor;
gl_FragColor=vec4(color,1.);
}
|
项目地址
Ray Marching Fire